|
Obsrv.org Info
Net Setup Guides Improvements Game info |
Network /
PCSX2 Network SetupOnce you have set up an in-game connection, it will work for both File 1 and File 2. The connection setup uses the exact same menu layout and options in both, so although this page uses File 2, File 1 will work the same way. PCSX2 versions 1.6.0 and lower only: required Dev9 plugin downloadIf you are using 1.6.0 versions or earlier of PCSX2, you will need to download CLR_Dev9 from here and place it in your "plugins" folder under the PCSX2 directory. Select the plugin in PCSX2.
 1. Download and insert the memory card fileLeotreves was kind enough to set up a memory card file that with all characters, levels, and other bonuses unlocked and a pre-configured network configuration with all of the settings set to "Auto," which allows us to connect in the vast majority of cases by setting one option in the PCSX network settings. You do not need to follow any other instructions from that thread. If you prefer not to have all unlocks available from the start, simply skip to Step 2. Setting up the PCSX2 network configuration, and then create a network configuration with all settings set to auto. There is also a patch file available that will provide the File 3 characters and leave everything else locked so you can progress naturally. These characters are included with the pre-configured card above. For tips on how to apply the patch on a PS2, see the OPL/ps2rd sections of Widescreen. For OPL this will involve converting the pnach into a .CHT file. Download the memory card file from this thread. Enter the PCSX2 memory card settings screen. Move the memory card file into the "memcards" folder under your PCSX2 directory. Click "Refresh," and then right click "Mcd001 - Generic connection 12-29-2020.ps2" from the list and select "Use for Port 1". If you are on 1.6.0, right click and select "Insert." Note: if there was already a card in slot 1/port 1, eject it. The generic card has to be in slot 1/port 1.
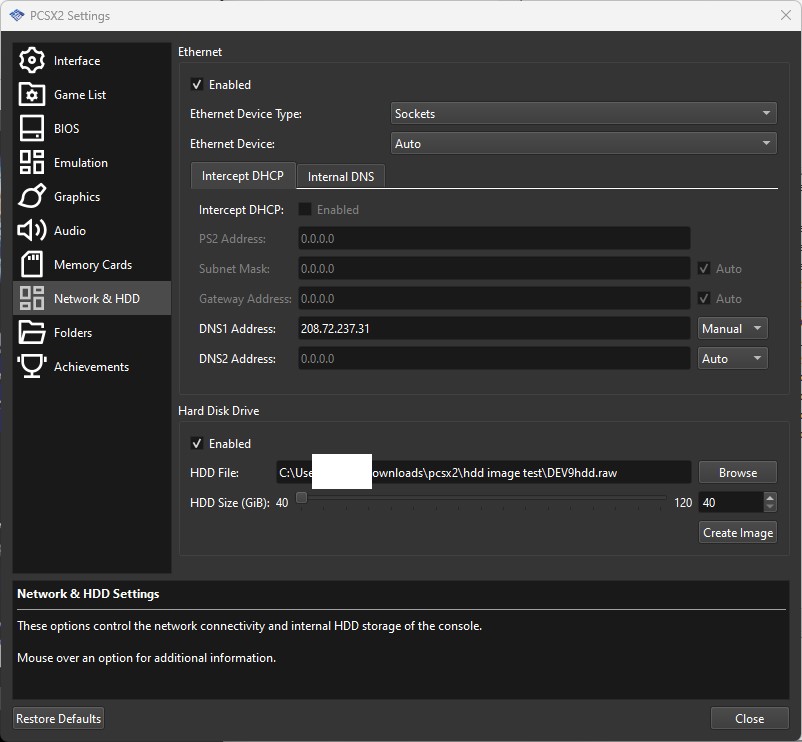
2. Configure PCSX2 Network SettingsConfigure the CLR_Dev9 settings, accessible by Config-->Dev9-->Plugin Settings (1.6.0 and earlier), or "Config --> Network & HDD Settings" (2.5.x nightlies)
 3. ConnectStart the game, choose PRESS F9 IF YOU CANNOT SEE ANYTHING AT THE NETWORK CONNECTIONS SCREEN. THIS WILL TEMPORARILY SWITCH TO SOFTWARE RENDERING. WHEN YOU ARE DONE, PRESS F9 TO SWITCH BACK TO HARDWARE RENDERING
a. If you receive an error message and there is no connection to selectSome PS2 bios versions are not compatible with the We will delete the connection since it is not compatible and then make an automatic connection.

Now head over to Creating a new connection manually What to do if these methods do not workIf you have no luck with these methods, as stated above, head on over to Alternate DNS Setups. If you're having trouble following any of the steps, still can't get your connection setup working, or need clarification, stop by Troubleshooting for a list of things to go over and how to submit a troubleshooting request. |